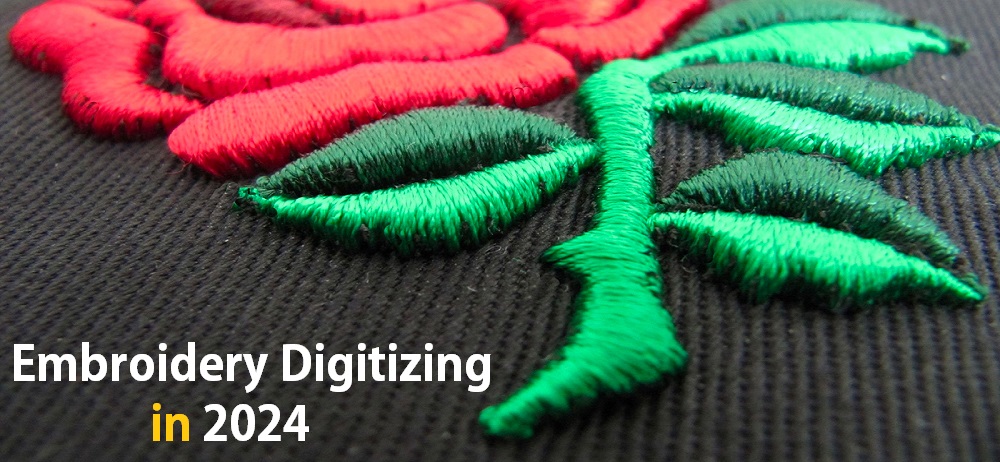
3D puff embroidery is a popular technique used to add depth and texture to embroidery designs. This technique involves using a foam material that is placed beneath the embroidery stitches, creating a raised effect that gives the design a three-dimensional look. The foam is typically a soft, flexible material that can be easily manipulated and stitched onto various fabrics and materials. 3D puff embroidery can be used for a wide range of projects, including hats, jackets, bags, and more, and offers a unique and eye-catching finish. By combining the traditional art of embroidery with the added dimension provided by the foam, 3D puff embroidery allows for the creation of stunning and highly detailed designs.
With the use of different thread colors and techniques like satin stitch, the result is a design that not only looks visually appealing but also adds depth and texture to any garment or accessory. So, whether you’re looking to add an element of interest to your next machine embroidery project or want to explore new techniques in the embroidery industry, 3D puff embroidery is a great option to consider.
Table Of Contents
1. Advantages of 3D Puff Embroidery
2. Materials Needed for 3D Puff Embroidery
3. Additional Materials For 3d Puff Embroidery
4. Techniques Used in 3D Puff Embroidery
5. Effects Created by 3D Puff Embroidery Projects
6. Three-dimensional Effect in 3D Puff Embroidery
7. Unique Designs and Patterns with Threads and Foams
8. Final Words
9. FAQs (Frequently Asked Questions)
1. Advantages of 3D Puff Embroidery
3D Puff Embroidery is a popular technique in the embroidery industry for a number of reasons. One of the main advantages of this technique is that it adds dimension to embroidery designs, creating a unique and eye-catching look.
By using a piece of special foam called puffy foam, the embroidery machine is able to stitch over it, resulting in a raised, three-dimensional effect. This adds depth and texture to the design, making it stand out and giving it a more luxurious appearance.
Another advantage of 3D Puff Embroidery is its versatility. This technique can be applied to a wide range of items, including hats, caps, bags, and hoodies. Whether you are looking to personalize a baseball hat or add a unique touch to a tote bag, 3D Puff Embroidery is a great option.
In addition to its aesthetic appeal, 3D Puff Embroidery offers practical benefits as well. The foam used in this technique acts as a stabilizer, preventing thread breaks and ensuring a more durable final product. Furthermore, the excess foam can be easily removed with a heat gun, leaving behind a clean and professional finish.
2. Materials Needed for 3D Puff Embroidery
To create stunning three-dimensional designs with puffy foam, you’ll need a few key materials. Firstly, you’ll need puffy foam, which is a specialized foam sheet designed for puff embroidery. This foam comes in various colors and thicknesses, allowing you to choose the best option for your design. Secondly, you’ll need an embroidery machine capable of stitching over the foam. Ensure that your machine has the necessary settings and attachments for 3D puff embroidery. Additionally, you’ll need tear-away stabilizer to provide support and stability to your design during the embroidery process.
This stabilizer prevents distortion and helps reduce thread breaks. Lastly, you’ll need a heat gun to remove any excess foam after the embroidery is complete. This handy tool allows you to easily melt away the excess material, leaving behind a clean and professional finish. With these materials in hand, you’ll be ready to bring your designs to life with 3D puff embroidery.
2.1 Piece of Foam
When it comes to creating eye-catching three-dimensional embroidery designs, using a piece of foam is a crucial technique. The foam used in 3D puff embroidery is typically made from high-density polyethylene (HDPE) – a lightweight, durable, and flexible material perfect for embroidery projects.
One of the main characteristics of foam for 3D puff embroidery is its thickness. It is available in various thicknesses, allowing you to achieve different levels of dimension in your designs. Additionally, foam comes in a range of colors, making it easy to match with your desired thread colors.
Choosing high-quality foam is essential to achieve a smooth, even surface on your embroidery. The foam should be dense enough to hold its shape but still easy to stitch through. This ensures that your embroidery machine can stitch accurately without damaging the foam.
Using a piece of foam in 3D puff embroidery adds depth and texture to your designs, creating a stunning and professional finish. So, when selecting foam for your embroidery projects, be sure to consider its thickness, color, and most importantly, its quality to achieve remarkable results.Time to get creative and start experimenting with this incredible embroidery technique!
2.2 Choose Thread Colors
Thread colors play a crucial role in 3D Puff Embroidery, as they can greatly enhance the overall design and make the embroidery stand out. Choosing the right thread colors is essential to create contrast and achieve a visually appealing result.
When selecting thread colors for 3D Puff Embroidery, there are a few key factors to consider. Firstly, matching the thread color with the foam color is important. This ensures that the foam blends seamlessly with the embroidery, creating a cohesive look. For instance, if you are using white foam, using white thread would be a good choice to maintain a clean and consistent appearance.
Secondly, selecting thread colors that complement the fabric is vital. By choosing thread colors that contrast with the fabric, the embroidery design is more likely to catch the viewer’s attention. For example, if the fabric is dark, using lighter thread colors for the embroidery can create an eye-catching effect.
3 Additional Materials For 3d Puff Embroidery
In addition to thread and foam, there are several additional materials that are commonly used in 3D Puff Embroidery to achieve the desired three-dimensional effect. These materials serve specific purposes and are essential for the embroidery process.
3.1 Tear-Away Stabilizer
Tear-away stabilizer is a type of backing that provides support and stability to the fabric during the embroidery process. It is placed underneath the fabric and helps prevent distortion or puckering. Once the embroidery is complete, the excess stabilizer can be torn away easily, leaving a clean and professional finish.
3.2 Heat Gun
A heat gun is a tool that is used to activate the adhesive backing of the foam. After the foam is positioned on the fabric, the heat gun is passed over it to melt the adhesive and secure the foam in place. The heat gun also helps to give the foam its three-dimensional shape by making it puff up.
3.3 Craft Foams or Puffy Foam
Craft foams or puffy foam sheets are the additional materials used to create the raised effect in 3D Puff Embroidery. These foam sheets are available in various colors and thicknesses and can be cut into shapes or used as a whole sheet. The foam is placed on the fabric before the embroidery machine stitches over it, creating the raised and textured look.
When it comes to the embroidery industry, there are several well-known brands and types of tear-away stabilizers and craft foams that are commonly used. Some popular brands include Sulky Tear-Easy Stabilizer and Floriani Tear-Away Medium. As for craft foams, brands like Baby Lock Puffy Foam and Floriani Puffy Foam are widely used and trusted for their quality and compatibility with embroidery machines.
These additional materials, such as tear-away stabilizer, heat gun, and craft foams, are integral to achieving the distinctive three-dimensional effect in 3D Puff Embroidery. They provide support, shape, and texture, enhancing the overall appearance of the embroidery projects.
4. Techniques Used in 3D Puff Embroidery
In the world of embroidery, 3D Puff Embroidery has gained popularity for its unique and eye-catching raised effect. This technique involves using tear-away stabilizer to provide support, a heat gun to activate the adhesive backing of foam, and craft foams or puffy foam sheets to create the desired three-dimensional look. Tear-away stabilizer ensures the fabric remains stable during the embroidery process, preventing distortion. The heat gun is used to melt the adhesive on the foam, securing it into place and giving it that puffed-up appearance. Craft foams or puffy foam sheets are available in various colors and thicknesses, allowing for endless possibilities in creating raised and textured designs.
Trusted brands such as Sulky, Floriani, and Baby Lock offer tear-away stabilizers and craft foams specifically designed for compatibility with embroidery machines. With these techniques and materials, 3D Puff Embroidery adds depth and dimension to any embroidery project, making it stand out with its unique and visually appealing look.
4.1 Satin Stitch Technique
The Satin Stitch technique is an essential aspect of 3D Puff Embroidery, creating a smooth and satin-like appearance. This technique involves using closely spaced parallel stitches that cover the surface area of the design.
To create the Satin Stitch, start by selecting suitable thread colors that will complement the design. It’s important to choose thread colors that contrast well with the base fabric to ensure the design stands out.
In Hatch Embroidery, adjusting the stitch spacing is crucial for achieving the desired effect. For puffy foam embroidery, it is recommended to set the stitch spacing to an optimal value of 0.16 mm. This slightly tighter spacing allows for better coverage and adherence to the foam, resulting in a more pronounced three-dimensional effect.
When executing the Satin Stitch, it’s important to ensure even tension throughout the embroidery process to prevent thread breaks or bunching. Additionally, using tear-away stabilizer and a layer of foam beneath the design helps to provide stability and support for the stitches.
4.2 Regular Embroidery Technique
Regular embroidery technique is a traditional approach used to create intricate designs on fabric. It involves using various types of stitches to form patterns and motifs. This technique is commonly employed in 3D puff embroidery to add dimension and depth to the designs.
In regular embroidery, a wide range of stitch types can be used, such as the satin stitch, running stitch, or chain stitch. These stitches can be combined in different ways to create unique and eye-catching designs on the fabric.
In 3D puff embroidery, the regular embroidery technique is enhanced by the addition of a layer of foam. This foam serves as a base for the stitches and adds a three-dimensional effect to the design. By placing the foam beneath the fabric, the stitches are lifted and appear raised, giving the design a puffy appearance.
The regular embroidery technique is known for its versatility and ability to create intricate and elaborate designs. The combination of regular embroidery with the layer of foam in 3D puff embroidery allows for the creation of stunning and visually appealing designs with added texture and depth.
4.3 Flat Embroidery Technique
The flat embroidery technique is a key component of the 3D puff embroidery process. Unlike other embroidery techniques, flat embroidery is the foundation on which the three-dimensional effect is achieved. This technique involves stitching directly onto the fabric without any additional layers or foam.
The first step in executing the flat embroidery technique is to choose the desired design and transfer it onto the fabric using an embroidery machine or by hand. Next, select the appropriate thread colors to bring the design to life. This is an important step as the thread color choice can greatly impact the overall appearance of the finished embroidery.
Once the design and thread colors are chosen, the embroidery machine is set up with the selected colors and the fabric is securely hooped. The machine then begins stitching the design onto the fabric, following the digitized pattern.
During this process, it is crucial to monitor the machine for any thread breaks or irregularities. These issues should be addressed promptly to ensure the stitch quality remains consistent throughout the embroidery.
To achieve the best results with flat embroidery in 3D puff embroidery, it is essential to use high-quality embroidery thread and a reliable embroidery machine. Additionally, proper tension control and hooping techniques should be employed to ensure the stitches are even and smooth.
4.4 Excess Foam Removal Technique
In 3D puff embroidery, excess foam can be carefully removed to achieve a clean and professional finish. There are two common methods used for foam removal: using sharp scissors or a heat gun.
To remove excess foam using sharp scissors, start by gently cutting around the embroidered design. Take care to trim as close to the stitches as possible without cutting into them. This method requires precision and caution to avoid damaging the embroidery.
Alternatively, a heat gun can be used to remove excess foam. With this method, the heat gun is directed towards the foam, causing it to melt and shrink. Move the heat gun in a sweeping motion across the foam. Being careful not to stay in one spot for too long to avoid scorching the fabric or causing any damage.
Whether using scissors or a heat gun, it is important to work slowly and carefully, making small, controlled cuts or applying heat gradually. Always double-check the foam removal to ensure a clean finish without any remaining excess material.
4.5 Layer of Foam Technique
The Layer of Foam Technique is a popular method used in 3D puff embroidery to add depth and dimension to projects. By placing a layer of foam underneath the fabric before stitching, this technique creates a raised effect that makes the embroidery design stand out.
To use this technique, start by preparing the fabric. Choose a suitable fabric and ensure it is clean and free from any wrinkles. Then, position the foam on top of the fabric, making sure it aligns with the desired area for the raised effect. The foam should be slightly larger than the design to allow for trimming later.
Next, carefully secure the foam in place. Use adhesive spray or temporary adhesive to stick the foam to the fabric. Ensure that the foam is evenly adhered to prevent any shifting during the embroidery process.
Once the foam is secure, proceed with regular embroidery techniques. Select the desired thread colors and embroidery designs. With the foam in place, the embroidery machine will stitch through both the fabric and the foam, creating a three-dimensional effect.
After the embroidery is complete, carefully trim the excess foam using sharp scissors, making sure to avoid cutting into the stitches. Take your time to achieve a clean finish.
The Layer of Foam Technique is a simple yet effective way to enhance your embroidery projects. It adds a unique raised effect that adds depth and dimension, resulting in beautiful and eye-catching designs.
5. Effects Created by 3D Puff Embroidery Projects
3D puff embroidery is a technique that adds dimension and texture to your embroidery projects. By using a layer of foam, the stitches are raised off the fabric, creating a unique three-dimensional effect. This technique is widely used in industries such as fashion, sports, and promotional products to add a touch of creativity and visual interest to various items like hats, bags, and garments.
With the right combination of thread colors and design choices, 3D puff embroidery can take your projects from ordinary to extraordinary. In this article, we will explore the effects and benefits of 3D puff embroidery, as well as tips to achieve stunning results.
6. Three-dimensional Effect in 3D Puff Embroidery
3D Puff Embroidery is an embroidery technique that creates a unique three-dimensional effect in embroidery projects. It involves the use of foam under the design, which raises the thread and gives it a raised and dimensional look.
The foam acts as a padding material and is placed underneath the areas where the design requires height and depth. As the embroidery machine stitches the design, the thread conforms to the shape of the foam, creating a raised appearance. This technique is especially popular for adding a textural element to designs, such as logos or lettering.
One of the fascinating aspects of 3D Puff Embroidery is that it can create different effects depending on the intricacy of the design. Complex interlaced patterns or thin lines may have a slightly lower “crown” compared to bolder strokes. This variation in height adds depth and dimension to the design, making it visually appealing.
The three-dimensional effect achieved through 3D Puff Embroidery adds a unique touch to embroidery projects, making them stand out from regular embroidery designs. It is commonly used in various items like hats, clothing, bags, and more. Additionally, the foam used in this technique is available in a variety of colors, allowing for further customization with different thread colors.
To create stunning embroidery designs with a raised, dimensional look, consider exploring the world of 3D Puff Embroidery. It is a great way to add a unique touch to your embroidery projects and make them truly unforgettable.
7. Unique Designs and Patterns with Threads and Foams
Unique designs and embroidery patterns can be created using threads and foams in 3D Puff Embroidery. This technique allows for the creation of raised and dimensional designs that stand out from regular embroidery.
When selecting designs for 3D Puff Embroidery, it is important to consider the intricacy of the design. Complex interlaced patterns or thin lines may have a slightly lower “crown” compared to bolder strokes. This variation in height adds depth and dimension to the design, making it visually appealing.
To enhance the 3D effect, several techniques can be employed. Stitch density plays a crucial role in creating a raised effect, as denser stitches create more height. Stitch angles can also be adjusted to control the direction and appearance of the raised areas. Pre-termination of columns can create a more defined edge, while foam-specific underlay helps secure the foam and ensures even distribution of stitches.
These techniques, combined with the use of different-colored threads and foams, allow for endless possibilities in creating unique and eye-catching designs. Whether it’s logos, lettering, or intricate patterns, 3D Puff Embroidery adds a touch of dimension that sets embroidery projects apart from the rest.
8. Final Words
In conclusion, 3D Puff Embroidery offers many advantages in creating visually stunning and eye-catching designs. The technique allows for the creation of a three-dimensional effect, adding depth and dimension to the embroidery. The raised areas of the design create a tactile and visually appealing texture that captures attention.
To achieve successful 3D Puff Embroidery projects, it is essential to use the proper materials and techniques. Using a foam-specific underlay helps secure the foam and ensures even distribution of stitches, resulting in a more defined and uniform design. Additionally, selecting the right 3d puff embroidery services can greatly enhance the final outcome.
When choosing thread colors for Embroidery, it is important to consider contrast and visibility. Using contrasting colors can make the design pop and stand out, while selecting complementary shades can create a more harmonious look. Additionally, considering the color of the fabric and the desired aesthetic can help guide the thread color selection process.
9. FAQs (Frequently Asked Questions)
Q1: What techniques are involved in 3D Puff Embroidery?
3D Puff Embroidery requires specific techniques to create the three-dimensional effect. These techniques include using a foam-specific underlay, selecting the right embroidery machine and digitizing services, and utilizing tear-away stabilizers and craft foams.
Q2: What is puff embroidery?
Puff embroidery, also known as 3D puff embroidery, is a technique that creates a raised, three-dimensional effect on embroidered designs. It involves stitching over a piece of foam or puffy foam to achieve the desired texture and dimension.
Q3: How does 3D puff embroidery differ from regular embroidery?
3D puff embroidery differs from regular embroidery in that it adds an extra layer of foam or puffy foam to create a raised and textured effect. Regular embroidery typically involves stitching directly onto the fabric without any additional materials.
Q4: What is foam embroidery?
Foam embroidery is a specific type of embroidery that incorporates foam or puffy foam to add dimension and texture to the design. The foam is placed underneath the stitches to create a raised effect, giving the embroidery a three-dimensional look.
Q5: What is puffy foam embroidery?
Puffy foam embroidery is another term for 3D puff embroidery or foam embroidery. It refers to the technique of using foam or puffy foam to create a raised and textured effect on embroidered designs.


