Cap-Hat Embroidery can seem daunting, but with the right approach and technique, you can achieve professional results with ease. Follow this step-by-step guide to master the art of Cap-Hat Embroidery:
Step 1: Gather Your Materials
Embarking on a Cap-Hat Embroidery project requires specific tools and materials. Here’s what you’ll need:
1. Caps/hats: Opt for high-quality caps made of durable material, preferably with a structured front panel to provide stability during embroidery.
2. Embroidery machine: Ensure your machine is capable of embroidering caps and equipped with the necessary accessories like cap frames or hoops.
3. Stabilizer: Choose the appropriate stabilizer based on the material of the cap. For structured caps, a medium to heavy-weight stabilizer works well, while lightweight caps may require a softer, tear-away stabilizer.
4. Embroidery thread: Invest in high-quality embroidery thread that is both durable and colorfast. Consider the color scheme of your design and select thread colors that complement each other.
5. Embroidery design: Select or create a design suitable for Cap-Hat Embroidery. Keep in mind that intricate designs may not translate well onto the curved surface of a cap, so opt for bold, simple designs for best results.
Step 2: Prep the Cap
Preparing the cap properly is essential for a successful embroidery project:
1. Clean the cap: Thoroughly clean the cap to remove any dirt, dust, or oils that could interfere with the embroidery process. A clean surface ensures better adhesion of the stabilizer and prevents any imperfections in the final embroidery.
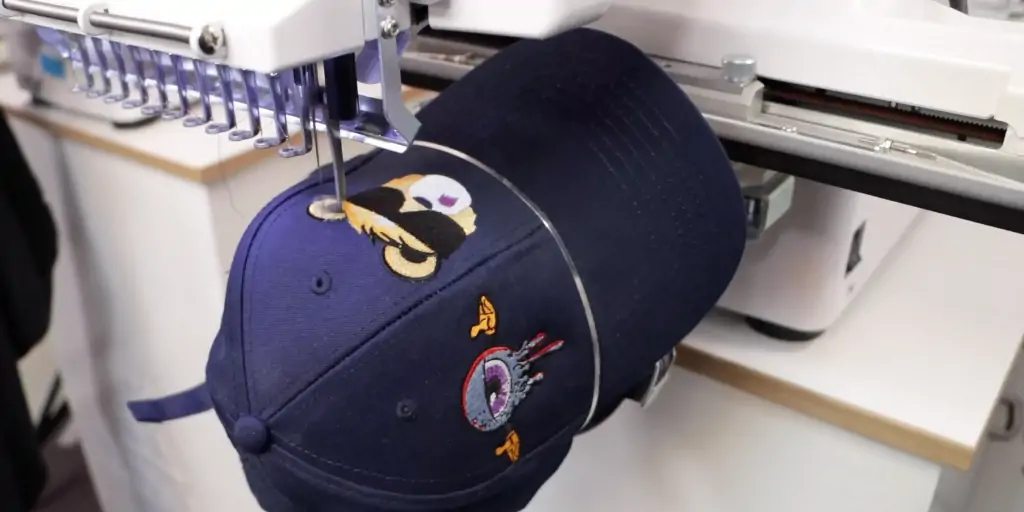
2. Insert a cap frame or hoop: Insert a cap frame or hoop inside the crown of the cap to stabilize it during embroidery. These frames or hoops help maintain the shape of the cap and provide a flat surface for stitching.
3. Secure the cap: Once the cap is positioned on the cap frame or hoop, secure it firmly in place to prevent any movement during embroidery. Ensure that the cap is centered and aligned correctly to avoid distortion or misalignment of the design.
Step 3: Choose and Digitize the Design
Selecting and digitizing the design sets the foundation for your embroidery project:
1. Choose a suitable design: Select a design that is suitable for Cap-Hat Embroidery. Consider factors such as size, complexity, and stitch count. Opt for bold, simple designs that are easily recognizable and avoid intricate details that may not translate well onto the curved surface of the cap.
2. Digitize the design: Use embroidery software to digitize the chosen design. Adjust settings such as stitch density, underlay, and stitch direction to optimize the design for Cap-Hat Embroidery. Test the digitized design on a scrap piece of fabric to ensure it stitches out correctly before embroidering it onto the cap.
Step 4: Thread Selection
Choosing the right thread is crucial for achieving vibrant and long-lasting embroidery:
1. Select high-quality embroidery thread: Choose thread that is specifically designed for embroidery and is known for its durability and colorfastness. Consider the color scheme of your design and select thread colors that match or complement each other.
2. Consider thread weight and texture: Choose thread weights and textures that are suitable for the design and cap material. Thinner threads work well for intricate designs, while thicker threads provide more coverage for bold designs.
3. Thread the embroidery machine: Thread the embroidery machine with the selected thread colors according to the design requirements. Ensure that the thread is properly tensioned and threaded through the machine’s needle and bobbin.
Step 5: Set Up the Cap-Hat Embroidery Machine
Properly setting up the embroidery machine is essential for smooth stitching:
1. Check machine compatibility: Ensure that your embroidery machine is compatible with cap frames or hoops and capable of embroidering caps. Consult the machine’s manual for specific instructions on Cap-Hat Embroidery settings and techniques.
2. Adjust machine settings: Set the machine to the appropriate settings for Cap-Hat Embroidery, including hoop size, needle type, and stitch speed. Load the digitized design onto the machine and position it within the designated embroidery area.
3. Secure the cap: Place the prepared cap onto the cap frame or hoop and secure it firmly in place. Ensure that the cap is centered and aligned correctly to prevent any distortion or misalignment during embroidery.
Step 6: Embroider the Design
Embroidering the design requires patience and attention to detail:
1. Start with the outline: Begin embroidering the design by stitching the outline first. Follow the sequence specified in the digitized design to ensure proper alignment and registration of the stitches.
2. Fill in the details: Once the outline is complete, fill in the details of the design using the appropriate stitch types and colors. Monitor the Cap-Hat Embroidery process closely to ensure smooth stitching and make any necessary adjustments to tension or speed.
3. Pause for color changes: If the design requires multiple thread colors, pause the machine between color changes to trim the thread and change colors. Thread the machine with the new color and resume embroidery from where you left off.
Step 7: Finish and Inspect
Completing the embroidery process involves inspecting the finished design for quality:
1. Remove the cap: Once the embroidery is complete, remove the cap from the embroidery machine and trim any excess threads. Be careful not to cut into the Cap-Hat Embroidery stitches.
2. Inspect the stitching: Carefully inspect the stitching for any imperfections or errors, such as skipped stitches or thread breaks. Make any necessary adjustments or corrections to ensure a professional finish.
3. Clean the cap: Clean the cap to remove any stabilizer residue or markings left behind during Cap-Hat Embroidery. Use a mild detergent or spot cleaner and gently dab the embroidered area with a clean cloth to remove any stains or dirt.
Final Touches about Cap-Hat Embroidery
Put the finishing touches on your embroidered cap for a polished look:
Place a pressing cloth over the embroidered area and press it gently with a warm iron to set the stitches. Avoid applying too much heat or pressure, as this could distort the embroidery or damage the cap material. Step back and admire your embroidered cap, proud of the skill and effort you put into creating a unique and personalized piece of wearable art.
By following these detailed steps and paying attention to each aspect of the embroidery process, you’ll be able to embroider caps and hats like a pro, creating stunning designs that stand out from the crowd. With practice and patience, you’ll soon master the art of Cap-Hat Embroidery and unleash your creativity on a variety of headwear styles.
However, for those seeking a tactile approach, our embroidery services offer intricate detailing and texture to elevate fabric customization projects.


