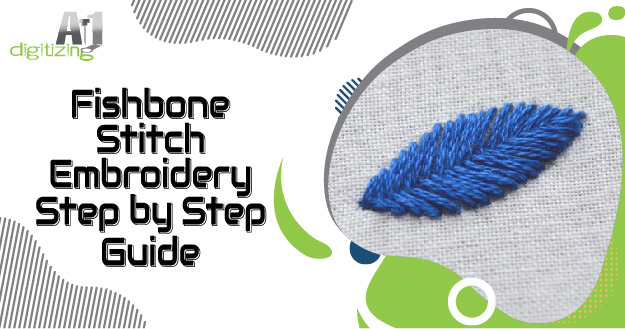
Fishbone stitch is a popular embroidery technique that is commonly used to create leaf shapes in various embroidery patterns. It is a type of filling stitch that is created using diagonal stitches that resemble the shape of a fishbone. This stitch is versatile and can be used to add depth and texture to any embroidery project. The fishbone stitch is often used to create realistic and intricate leaf patterns, as the stitches can be easily manipulated to follow the natural curves and veins of a leaf. With a little practice and patience, you can master this beautiful stitch and incorporate it into your embroidery repertoire.
Table Of Contents
1. Benefits of Fishbone Stitch
2. Threads and Tools Needed for Fishbone Stitch Embroidery
3. Pre-Stitching Steps to Take
4. Step by Step Guide for Embroidering the Fishbone Stitch
5. Begin with a Straight Stitch
6. V-Shaped Stitch at the End of the First Stitch
7. Horizontal Line Across the V-Shape of the First Stitch
8. Repeat Steps 1-3 to Complete the Fishbone Pattern
9. Tips and Tricks for Perfect Embroidery
10. Choosing Different Colors in Fishbone Stitch Embroidery
11. Making Sure Your Tension Is Consistent Throughout
12. Working Slowly and Carefully
13. Adjusting Pressure Depending on Fabric Type
14. The Takeaway
15. FAQs (Frequently Asked Questions)
1. Benefits of Fishbone Stitch
Fishbone stitch is a versatile and popular embroidery stitch that offers several benefits for your projects. One of the main advantages of this stitch is its ability to create a dense and textured look, especially when used to embroider leaves.
The slanted stitches of the fishbone stitch give the embroidered leaf a realistic appearance, mimicking the natural veins and texture found in real leaves. This stitch is ideal for adding dimension and depth to your embroidered designs, making them more visually appealing and engaging.
Another benefit of the fishbone stitch is that it allows you to experiment with different colors and shades of thread, creating a wide range of effects. Whether you want to depict a vibrant green leaf or a multicolored autumn leaf, the fishbone stitch enables you to achieve the desired look with ease.
While fishbone stitch is effective for embroidering leaves, there are alternative stitches you can use for different effects. For instance, satin stitch is ideal for filling large areas with smooth and even stitches, while stem stitch or straight stitch can be used for outlining and adding details to the leaves.
Preparations
Before you start embroidering with the fishbone stitch, there are a few preparations you should make. First, gather all the necessary materials, including embroidery needles, embroidery thread in your desired colors, an embroidery hoop, and fabric. It’s important to choose the right fabric for your project, such as cotton or linen, as they provide a stable surface for the stitches. Next, prepare your fabric by washing and ironing it to ensure a smooth and clean working surface. Once you have everything ready, you can begin the exciting journey of fishbone stitch embroidery.
2. Threads and Tools Needed for Fishbone Stitch Embroidery
To create beautiful fishbone stitch embroidery, you will need a few essential embroidery threads and tools. These items are necessary to achieve the desired effect and ensure a successful outcome for your project.
1. Threads
The type of thread you choose is crucial for fishbone stitch embroidery. Embroidery floss is the most commonly used thread for this technique. It comes in a variety of colors and is made up of multiple strands that can be separated to create different effects. Choose high-quality embroidery threads that complement your fabric and design, and consider using different shades of green for a leaf pattern or other colors for different designs.
2. Hand Sewing Needle
A hand sewing needle with a sharp point and a thin eye is essential for fishbone stitch embroidery. The size of the needle depends on the fabric you are using. For finer fabrics, a smaller needle is recommended, while for thicker fabrics, a larger needle will be more suitable. Select a needle that allows you to easily pass through the fabric without leaving visible holes.
3. Hoop
Using a hoop is highly recommended to keep your fabric taut and wrinkle-free during the embroidery process. It helps to maintain consistent tension, allowing you to create neat and even stitches. Choose a hoop that is appropriate for your fabric size, and make sure it is tightened securely to prevent any fabric movement.
Remember that the choice of needle, fabric, and color scheme should be considered when embarking on your fishbone stitch embroidery journey. By using the right threads and tools, you can create stunning fishbone stitch designs with ease.
3. Pre-Stitching Steps to Take
Before starting the fishbone stitch embroidery, there are a few important pre-stitching steps that need to be taken to ensure the best results.
First, it is recommended to draw a light line down the canvas to serve as a guide for the stitch. This will help you maintain a consistent angle and shape for your fishbone stitches.
Next, thread the needle with your chosen embroidery floss. Bring the threaded needle out through the underside of the hoop canvas at the top of the drawn line. Then, bring the needle back down about one centimeter underneath the line.
Now, it’s time to make the base of the stitch. Pull the embroidery floss up through the back of the fabric, following the line you have drawn. Then, push it back through the fabric at the bottom of the leaf.
By following these pre-stitching steps, you will be well-prepared to start creating beautiful fishbone stitch embroidery.
4. Step by Step Guide for Embroidering the Fishbone Stitch
Embroidery enthusiasts often turn to the fishbone stitch to create delicate and realistic leaf designs. This step-by-step guide will walk you through the process of embroidering the fishbone stitch, allowing you to add a touch of nature to your creative projects. By following these simple steps, you’ll be able to master this beautiful stitch and bring your embroidered leaves to life.
Step 1: Prepare your canvas
Start by drawing a light line down the canvas to serve as a guide for your stitch. This line will help you maintain a consistent angle and shape for your fishbone stitches.
Step 2: Thread your needle
Thread your embroidery needle with the desired floss color. Make sure to choose a shade of green that resembles the leaf you want to embroider or experiment with different colors for a unique effect.
Step 3: Start the stitch
Bring the threaded needle out through the underside of the hoop canvas at the top of the drawn line. Then, bring the needle back down about one centimeter underneath the line, creating a diagonal shape.
Step 4: Create the base of the stitch
Pull the embroidery floss up through the back of the fabric, following the line you have drawn. Then, push it back through the fabric at the bottom of the leaf.
Step 5: Continue stitching
Repeat step 4 on the opposite side of the leaf, creating a V shape with the two stitches. Make sure the stitches of the second side touch the first side’s stitches at the central point.
Step 6: Repeat the process
Continue working your way down the leaf, alternating sides and creating diagonal stitches that overlap to create a fishbone pattern. Make sure each stitch touches the previous stitch’s central point to maintain consistency.
Step 7: Finishing touches
Once you have filled the entire leaf with the fishbone stitch, secure the last stitch by knotting the floss at the back of the fabric. Trim any excess floss.
With practice, you’ll be able to create stunning embroidered leaves using the fishbone stitch. Explore different variations and experiment with different shades and patterns to elevate your embroidery projects to new heights.
5. Begin with a Straight Stitch
To start the fishbone stitch embroidery, you will first create a straight stitch at the tip of the leaf shape. This will serve as the foundation for the fishbone stitch pattern.
Begin by bringing the embroidery needle up at point 1, which is the topmost point of the leaf shape. Take the needle back down at point 2, which should be a short distance away from point 1, creating a small vertical stitch.
It is recommended to use a full 6 strands of embroidery floss for better visibility and coverage. By using all the strands, you can achieve a bold and defined stitch.
This straight stitch acts as the starting point for the fishbone stitch. It forms the central line down the leaf shape, which will serve as a guide for the subsequent diagonal stitches that will create the fishbone pattern.
Once you have successfully created the straight stitch, you can move on to the next step of the fishbone stitch embroidery, where you will begin adding the diagonal stitches to form the distinctive fishbone shape.
6. V-Shaped Stitch at the End of the First Stitch
After creating the straight stitch as the starting point for the fishbone stitch pattern, the next step is to create a V-shaped stitch at the end of the first stitch. This V-shaped stitch adds depth and dimension to the fishbone stitch embroidery.
To create the V-shaped stitch, bring the embroidery needle back in at a specific point. This point should be directly opposite the end of the first stitch, forming an angle that resembles the letter V. Make sure to position the needle slightly to the side of the central line formed by the first stitch.
Using the full 6 strands of embroidery floss, bring the needle up at the back of the fabric, close to the end of the first stitch. Then, insert the needle back in at the specific point opposite the end of the first stitch.
This V-shaped stitch forms the base of the diagonal stitches that will make up the fishbone stitch pattern. It is important to position the needle correctly and snugly against the central line to create a neat and precise V shape.
Once the V-shaped stitch is complete, you can proceed to the next step of the fishbone stitch embroidery, which involves creating more diagonal stitches to fill in the leaf shape.
7. Horizontal Line Across the V-Shape of the First Stitch
Once you have created the V-shaped stitch, it’s time to add a horizontal line across the V-shape to complete the fishbone stitch pattern. This step adds further dimension and structure to your embroidery design.
To start, take your embroidery needle and thread up at the point where the V-shape ends. Position the needle on the opposite side of the V-shape, ensuring that it is aligned horizontally. This will be the starting point for your horizontal line.
Next, bring the needle and thread down on the opposite side of the V-shape, forming a straight line across the V-shape. Be careful to maintain an even tension to create a neat and consistent line.
Repeat this process for each V-shape stitch in the fishbone stitch pattern. Each horizontal line should be parallel and aligned with the previous stitch, creating a uniform look.
Remember, the choice of needle and thread color can greatly impact the final result. Experiment with different shades of green for a leaf pattern or explore other colors to create unique embroidery designs.
Mastering the fishbone stitch’s horizontal lines allows you to add intricate details to your embroidery projects. With practice, you can achieve a perfect stitch and create beautiful and eye-catching designs with this versatile and effective embroidery technique.
8. Repeat Steps 1-3 to Complete the Fishbone Pattern
Now that you have successfully created the initial V-shaped stitch and added a horizontal line, it’s time to repeat these steps to complete the fishbone stitch pattern and embroider the remaining sections of the leaf.
To begin, bring your needle and thread out at point (1), which should be near the top tip of the design. Make a single small, straight stitch at point (2). This serves as the starting point for each new V-shaped stitch.
Once you have made the initial stitch, create a horizontal line across the V-shape by bringing the needle and thread down on the opposite side of the V-shape. Be sure to maintain an even tension to achieve a neat and consistent line.
Continue repeating steps 1-3 all the way down the leaf, making sure to have a long thread available. Each new V-shaped stitch should be parallel and aligned with the previous stitch, creating a uniform and beautiful fishbone stitch pattern.
Remember to take your time and pay attention to detail as you embroider the remaining sections of the leaf. The fishbone stitch offers a fantastic way to add dimension and texture to your embroidery designs, allowing you to create stunning and intricate patterns with ease.
Feel free to experiment with different colors, thread thicknesses, and stitch lengths to create unique and personalized fishbone stitch patterns. Whether you’re embroidering leaves, flowers, or any other design, the fishbone stitch will undoubtedly add a touch of elegance to your embroidery journey.
9. Tips and Tricks for Perfect Embroidery
Embroidery is a beautiful and intricate art form that requires patience, precision, and skill. Here are some tips and tricks to help you achieve perfect embroidery results:
Tip 1. Choose the right fabric:
The fabric you choose plays a crucial role in the outcome of your embroidery. Opt for a fabric that is stable, smooth, and easily accommodates the needle and thread.
Tip 2. Use the appropriate needle and thread:
Select a needle and thread that are suitable for your fabric and embroidery design. The needle should be sharp enough to pass through the fabric without causing damage, and the thread should be strong enough to withstand tension.
Tip 3. Secure your fabric:
Before you begin embroidering, make sure your fabric is properly secured in an embroidery hoop or frame. This will prevent any shifting or wrinkling of the fabric, allowing you to create clean and accurate stitches.
Tip 4. Plan your design:
Before you start stitching, plan your design by sketching it onto the fabric or using water-soluble embroidery transfer pens. This will help you visualize the final result and ensure that you stitch the right areas.
Tip 5. Practice proper tension:
Maintaining consistent tension is crucial for achieving even and neat stitches. Avoid pulling the thread too tightly or leaving it too loose. Practice on scrap fabric until you are comfortable with your tension control.
Tip 6. Start with basic stitches:
If you are new to embroidery, start with basic stitches such as the backstitch, satin stitch, or French knot. Mastering these stitches will give you a solid foundation before moving on to more intricate designs.
Tip 7. Pay attention to details:
Take your time and pay attention to the smallest details of your embroidery. Ensure that your stitches are uniform in size and direction, and that any gaps or overlaps are corrected as you go along.
Tip 8. Practice patience:
Embroidery is a slow and meticulous process, so be patient with yourself and enjoy the journey. Take breaks when needed to avoid eye strain and fatigue.
By following these embroidery tips and tricks, you can improve your embroidery skills and create stunning and professional-looking designs. Remember, practice makes perfect, so don’t be afraid to experiment and learn from your mistakes. Happy stitching!
10. Choosing Different Colors for Your Threads in Fishbone Stitch Embroidery
When it comes to fishbone stitch embroidery, choosing the right colors for your threads is essential to achieving the desired effect in your design. The colors you select can make a significant impact on the overall look and feel of your embroidery piece.
One important consideration is the choice between using colors that are closer to one another or opting for contrasting hues. If you want a more blended-in look, selecting colors that are similar or within the same color family can create a subtle and harmonious effect. This is especially useful when creating natural elements like leaves or petals, as it mimics the varying shades found in nature. On the other hand, using contrasting colors can make the color transition more obvious and can add a striking visual element to your embroidery.
Aside from color choices, the thickness of your threads also plays a role in the overall appearance of your embroidery. Thicker threads can create more texture and make the stitch lines more prominent, while thinner threads can result in finer and more delicate details. Consider the effect you want to achieve and the level of detail in your design when choosing the thickness of your threads.
For example, in brick stitch embroidery, using three shades of green can create a painterly effect that mimics the subtle blending of colors found in foliage. By using different shades within the same color family, you can achieve a realistic and vibrant depiction of leaves.
11. Making Sure Your Tension Is Consistent Throughout
When it comes to fishbone stitch embroidery, maintaining consistent tension is crucial to achieve clean and professional-looking stitches. Tension consistency refers to the even and balanced distribution of thread throughout the embroidery process.
Having even tension ensures that your stitches are uniform in size and appearance. It prevents loose or uneven stitches that can detract from the overall quality of your embroidery. When the tension is inconsistent, you may end up with areas that are too tight or too loose, resulting in a distorted and less polished finished stitch.
To achieve consistent tension, it is important to pay attention to your thread tension throughout the embroidery process. Whether you are working on a straight stitch or a diagonal stitch, make sure to maintain the same level of tension for each stitch. This can be achieved by holding the thread firmly but not too tightly as you pull it through the fabric.
A good practice is to always check the tension of your stitches as you work. This will help you identify any inconsistencies early on and make necessary adjustments. By making sure your tension is consistent throughout, you will achieve clean and professional-looking stitches that elevate the overall quality of your fishbone stitch embroidery.
12. Working Slowly and Carefully
When embroidering the fishbone stitch, it is crucial to work slowly and carefully. This particular stitch requires precision and meticulous attention to detail. Rushing through the stitches can lead to uneven tension and messy finished results.
Working slowly allows you to focus on each individual stitch, ensuring that they are placed accurately and evenly. It gives you the opportunity to create a neat and tidy fishbone pattern, resembling the shape of a fishbone or leaf.
By taking your time and working carefully, you can maintain consistent tension throughout the embroidery process. This is vital for creating uniform and polished stitches. Uneven tension can result in distorted and less visually appealing embroidery.
To achieve the best results, hold the thread firmly but not too tightly as you pull it through the fabric. This will prevent excessive tension that could distort the shape of the fishbone stitch.
Embroidery is an art that requires patience. Take your time and work with precision and attention to detail to create beautiful fishbone stitch patterns.
13. Adjusting Pressure Depending on Fabric Type
When embroidering the fishbone stitch on different fabric types, it is important to adjust the pressure applied to ensure the stitch is executed correctly. The pressure exerted on the fabric can greatly impact the final result, preventing puckering or pulling.
For delicate fabrics such as silk or satin, it is crucial to use a gentle touch. Lighten the pressure applied to the needle, allowing it to glide smoothly through the material. This avoids any damage to the fabric and keeps the stitches even and precise.
On the other hand, when working with thicker or more sturdy fabrics like denim or canvas, slightly increase the pressure while stitching. This will help the needle penetrate the fabric and create solid and bold fishbone stitches.
Adjusting the pressure based on the fabric type is also beneficial in preventing puckering or pulling. Applying too much pressure on delicate fabrics may cause them to pucker or gather, distorting the overall design. In contrast, insufficient pressure on heavier fabrics can result in the fabric pulling or bunching up, leading to an uneven and messy appearance.
14. The Takeaway
In conclusion, mastering the art of fishbone stitch embroidery opens up a world of creative possibilities. This versatile stitch can add depth, texture, and realism to your designs, particularly when crafting intricate leaf patterns. However, success in fishbone stitch embroidery requires careful preparation, the right materials, and attention to detail.
Remember to choose the appropriate fabric, needle, and thread for your project and secure your fabric in an embroidery hoop. Prioritize consistent tension, work slowly and meticulously, and adjust your pressure based on the fabric type. For embroidery digitizing services in the USA, contact us to bring your unique designs to life. Happy stitching!
15. FAQs (Frequently Asked Questions)
Q1. What is the main benefit of using the fishbone stitch in embroidery?
The fishbone stitch is known for creating a dense and textured look, especially for embroidering leaves, adding realism and depth to designs.
Q2. What are the essential threads and tools needed for fishbone stitch embroidery?
You will need embroidery floss, a hand sewing needle, and an embroidery hoop, among other materials.
Q3. What pre-stitching steps should you take before starting fishbone stitch embroidery?
Pre-stitching steps include drawing a guiding line on the fabric, threading the needle, and creating the base of the stitch.
Q4. How do you start embroidering with the fishbone stitch?
Begin with a straight stitch at the tip of the leaf shape, which serves as the foundation for the fishbone stitch pattern.
Q5. Why is maintaining consistent tension important in fishbone stitch embroidery?
Consistent tension ensures uniform-sized and polished stitches, enhancing the overall quality of the embroidery.


